In this article, we’ll focus on migration from a physical application server to its Cloud-hosted replacement – migrating the installed applications, databases, user profiles, shares and data. The overall approach is generic, and can be used to migrate to any Cloud provider, such as Microsoft Azure, Amazon AWS, IBM Cloud (Bluemix / Softlayer), Rackspace and others. The migration process also allows migration to a different Windwos version, such as 2003 to 2016 and 32bit to 64bit.
Note that we will be performing a native migration, not OS or app virtualization. This means that the end result will be a “normal” Cloud server with the application stack, DBs, profiles and data from the original physical server. The advantage of this is that you don’t have to deal with each application separately, the application stack is migrated as-is even if no one remembers how it was configured in the first place, and you do not have the app virtualization overhead. The downside is that if some of your apps are incompatible with the new OS (i.e. if you are migrating from 2003 to 2016), they will still be incompatible after you migrate them.
The goal of this tutorial is to allow to complete a server migration in less than 4 hours of “attended” time (total time will of course be longer, mostly spent on transferring data and automated deployment on target).
The software used in this tutorial, Zinstall WinServ, is also available from IBM Services, as part of their full service package for large scale deployments. Contact your IBM account team in your region for more information.
Here is what you’ll find this this tutorial:
Before we dive into the detailed process description, here is a quick overview of what the migration process involves. You’ll find (much) more details below.
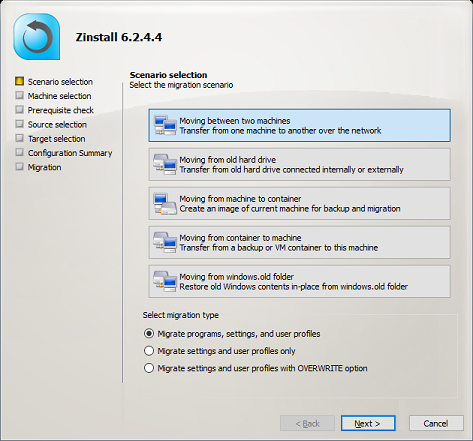
1. Capture the physical server into a migration container. This is done using Zinstall WinServ. The container is a complete capture of the server contents, similar to an image (complete except anything you decide to exclude)
2. Make the container accessible from your Cloud server. This is done by either uploading the container to your Cloud storage or to the target server itself, or by creating a VPN / tunnel connection between the two servers.
3. Deploy the contents of the container to the target Cloud server. This is again done using Zinstall WinServ, which automatically deploys applications, settings, databases, shares, profiles and data onto the target.
4. Make any required post-migration adjustments, such as adjusting config files for new server name, adjusting DNS to point to the replacement server etc.
We can now move on to a more detailed description.
Audit your servers: The first step in any migration is to figure out what’s on the server, which clients it servers, and what are the interfaces they expect to interact with. Interfaces are especially important. Once the migration is done, you will need to make sure the server is properly integrated into the new network, and that clients are able to reach it in its new location.
Schedule your migration time slot: Migrations take time, and during that time, your users may be affected to some extent. If possible, try and schedule the actual migration to be performed after hours or during a weekend. Note that you don’t actually have to stay there yourself at that time: application migration can be performed remotely or launched in advance in unattended mode.
Verify your backups are up to date, and are actually restorable: Any major upgrade may go wrong, and without a valid up-to-date backup, you risk losing everything you’ve had on the server. Make sure to verify that the backup you have is not damaged and ready to be restored if needed!
Part 1: Capture the physical (source) server into a container.
Part 2: Make the container accessible from the Cloud (target) server.
Once the container is created, we need to make it accessible from the target. This can be done either by uploading it to your desired cloud provider’s storage, or by setting up a VPN / tunnel connection between the servers.
Part 3: Deploy from the container onto the Cloud (target) server.
That’s it! You have just migrated applications, settings, profiles, databases, and of course files from your physical server to the Cloud server.
The two aspects not covered by the automated migration process described above are server roles (DC, AD, IIS, DNS, DHCP) and incompatible applications.
For more details, refer to the Server Roles and Incompatible Applications sections of the general Server Migration tutorial.
Once the migration process is complete, it is time to verify the results.
Congratulations! Your P2C server migration is now complete.
Ready to migrate your physical server to your new Cloud infrastructure? Contact us for assistance, volume licensing, and help in setting up a POC.
Note: The software used in this tutorial, Zinstall WinServ, is also available from IBM Services, as part of their full service package for large scale deployments. Contact your IBM account team in your region for more information.