Transfer everything from old computer to new computer with Windows 11
Transfer programs and files to new computer
Transfer files from one computer to another
Transfer Microsoft Office to new computer
Restore programs and files from a broken or dead computer
Transfer directly from an old hard drive
Transfer to new computer using a USB hard drive
Corporate Windows 11 migration
User Profile Migration to new PC / new domain
How To Migrate Local Profiles to Azure AD
Migration to Server 2019 / 2016
Transfer programs and files to new computer
Transfer files from one computer to another
Transfer Microsoft Office to new computer
Restore programs and files from a broken or dead computer
Transfer directly from an old hard drive
Transfer to new computer using a USB hard drive
Move To New PC - Compare Options
Migration Kit Pro - Advanced Transfer
Transfer programs and files to new computer
Transfer files from one computer to another
Transfer Microsoft Office to new computer
Restore programs and files from a broken or dead computer
Transfer directly from an old hard drive
Transfer to new computer using a USB hard drive
Updated January 2026 · 3 minute read
How To Transfer Parallels To a New Mac
Need to transfer your Parallels virtual machine to another computer? This tutorial will show you how. We will cover how to transfer Parallels from an Intel Mac to a new one running on M1 / M2 / M3, how to transfer from a Windows 10 Parallels to a Windows 11 Parallels, and of course the general case of how to transfer a Parallels virtual machine from one computer to another.
Parallels is a VM (virtual machine), so when the source Mac and the target Mac are the same, you could in some cases copy the VM manually, by copying the .pvm files from /Users/Shared/Parallels on the old computer, to the new one. However, this does not always work, certainly not when you need to move from an Intel Mac to an M1 / M2 Mac, or when your old Parallels is outdated and you need to migrate to a new version.
In this tutorial, we will focus on an automatic transfer, which does not have those limitations, and does not require manual work or technical skills.
Let’s see how that is done!
Before you begin
Before you start the transfer itself, you do need to install Parallels Desktop on the new Mac.
You should then create a new Parallels virtual machine on the new computer. We will then copy the contents of the old Parallels VM into the new one, so that you have your Windows programs, profiles, accounts and files – on a brand new Parallels architecture. And because we are using the new architecture, you do not have any limitations on what you can transfer – for example, transfer from Intel to M1, or from a Windows 10 Parallels to a Windows 11 Parallels, is fully supported.
How To Transfer Parallels To A New Mac
Now that you have a blank, new Parallels VM on the new Mac, it’s time to transfer the contents of your old Parallels.
For the actual transfer, we will be using Zinstall Migration Kit Pro, which you can get here.
The transfer is done in 2 parts. First, we capture the old Parallels VM to an external drive. Then, we deploy from that onto the new Parallels on the new Mac.
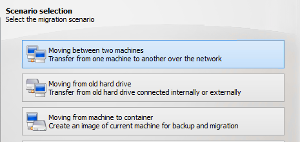
- On your old Parallels, download and run Zinstall Migration Kit Pro.
- Use its 3rd option, “Moving from Machine to Container”.
- Select the C: drive on the Source selection screen
- On Target selection, browse to your USB hard drive, and give the backup container a name that you’ll remember.
- Start the capture process. This should take a long while, and you will see a message confirming that the backup container has been created successfully.
- Now, move the USB drive to the new Mac, and run Zinstall Migration Kit Pro on the new Parallels VM.
- Use the 4th option, “Moving from Container to Machine”, and point it to the container you’ve saved to the USB drive.
- It will restore everything, including programs, settings and files, to the new Parallels VM.
That’s it – you have copied your programs, settings, profiles and data to from old Parallels to new Parallels, and it’s ready for use!
And because you are using the new Parallels architecture, you can do this even when moving from an Intel Mac to an ARM64 Mac (e.g. M1 / M2), when moving from a Windows 10 Parallels to a Windows 11 Parallels, or any other combination.
Ready to go?
Video tutorial – How to copy programs and files to new computer using a USB external drive
guarantee Buy now